My Granddaughter wanted me to make a purse/tote bag for her and she requested it to be made out of black bandanna's.
This was such a fun project that I decided to share this tutorial with you.
What you will need: two bandanna's, fabric for the lining - this will depend on the size of your bandanna's, fusible batting, webbing for the handles - the measurement for this depends on how long you will want your handles to be and velcro to close your bag with. Optional: decorative buttons and embroidery floss.
Here we go....
Well I had never done anything like this before. I have made tote bags, but not out of a bandanna. When I got them I saw right away that they were not straight, so had to try to square them up as best I could. I decided to cut an inch around the outside printed border.
I chose a fusible batting for this project. I cut it about 1/2 inch smaller than the trimmed bandanna.
After I got the batting fused, I marked my quilting lines. I stated from corner to corner, on the diagonal, and spaced them 1 & 1/2 inches apart. Starting in the middle I stitched all lines alternating the direction of the sewing.
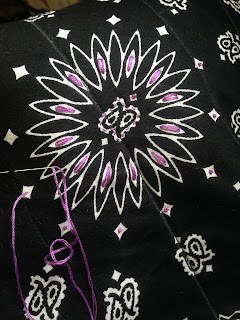
After I got the quilting done, on both pieces, to add a bit of color, I did some embroidery on the center medallion. This is just an option, you don't have to do this.
To make the purse/tote bag look more 'professional' I added a set in piece around the three sides and joined the front and back together with this strip. I cut this piece longer than the three sides to allow for sewing the corners. The width that I chose was 3 inches, so with the 1/2 inch seam allowance that I used it finished at 2 inches. You can choose how wide you want this piece to be.
For the lining, you will need to cut two pieces of fabric the same size as your quilted front and back pieces and one set-in piece. Remember to make it longer than the length of the three sides. You can trim it down if need be after you get it sewn in. On one of the large pieces I sewed two pockets, one for a cell phone and a larger one for 'what ever'.
Now you are ready to insert the lining into the bandanna bag, right sides together and sew around the top of the bag, leaving an opening for turning right side out.
After you have it sewn and turned right side out, I took my iron and ironed the edges flat. To keep the fabric in place I placed pins all around so when I did the top stitching the fabric wouldn't shift.
Next I attached the velcro strips to the inside of the purse/tote bag by hand. They come with adhesive on the backs of them that will gum up the needle of your sewing machine and create problems.
The last step is putting on your handles. I chose a webbed piece that I purchased at the fabric store or you can make your own out of your left over lining fabric or faux leather. You choose the length that you want them to be and then sew them on the outside of your bag. I found the middle of the bag, then measured out the distance that I wanted them spaced so they would be even. Top stitch them down.
Congratulations, you are all done!
This was a fun project and when I gave it to my granddaughter she said several of her friends loved it.
Hope you enjoyed this tutorial and will want to try making one for yourself or as a gift for someone.
Blessings to all.


