Total Pageviews

Tuesday, August 22, 2017

Oh, How I Love Sunflowers!


One of my favorite flowers is the Sunflower. I remember them from my childhood days of visiting my Great Grandma's farm. When got there, they were standing tall in the fields with their bright yellow faces, saying "hi" to me as we drove down, what seemed at the time, a long drive way to get to her house.
Today I have the pleasure of having my own sunflowers growing on our own little farm. I must admit, I have never sewn a sunflower seed, the birds do that for me. They do a lovely job of planting them in just the right spots. The picture below is from one of the seeds they planted for me. 


I thought I would share some fun facts about sunflowers with you:

1. Each sunflower is actually thousands of teeny flowers. As many as 2000 can make up "the classic sunflower bloom". 
  
2. You should harvest sunflowers in the morning, not the afternoon.  If you wait until the afternoon, they may wilt.   


3. Sunflowers are native to the America's and were domesticated around 1000 BC. Even way back then people saw the value of growing them, which are still harvested for their seeds and oil.      

4. A dried sunflower makes a unique, natural bird feeder. 
The birds have almost picked all of the seeds out of this one.

5. Each sunflower can contain as many as 1000 to 2000 seeds.


6. There are about 70 species of sunflowers. Their genus name is Helianthus (which comes from the Greek words for "sun" and "flower") While many look bright and cheery, their shapes can be quite different. For instance these funny "Goldie" sunflowers look like puffballs.       

7. The French word for sunflower is "tournesol" which means turns with the sun.


8. The tallest sunflower on record was over 30 feet tall!

9. Sunflowers have been planted to help soak up nuclear radiation.  They are actually good at absorbing toxins.   
   These fun facts were taken from: www.goodhousekeeping.com/home/gardening/a32638/sunflower-fun-facts/

Who doesn't like a pretty bunch of sunflowers to put on their table for a centerpiece?

My daughter surprised me with this gigantic sunflower the other day. It measures 9 1/2 inches across!


Here are a couple more pictures for your enjoyment.


One of my loves is sewing with wool, so I had to make up a little table topper with two of my favorite things, chickens and sunflowers.

Hope you have enjoyed learning a bit about these beautiful, happy flowers. This is the time of year that they are everywhere, please take a few minutes to admire their beauty and let them help lift your day.

I will close with a saying from Helen Mirren:

Blessings to all.


Monday, August 14, 2017

Little Quilts

It all started when I decided to remake the doll quilt that my Great Grandma made and gave to me as a child. How excited I was when I found my little quilt, while going thru my parents house after their passing away. However, it was in very bad condition. So, I decided to make another one and try to get it as close to the original one as I could. My dear Mama washed everything with bleach, so the original fabrics that my Grandma used no longer looked like they used to and I couldn't remember just how they looked. My Mama left me tons of cotton fabric and while going thru some of it, I found a plastic bag with some pieces of peachy pink fabric that looked like she had saved for a certain project. Well, I thought this would be perfect. I would recreate my doll quilt that my Great Grandma made with the fabric from my Mama's stash. So that is what I did. Grandma only tied my little quilt, but I decided to do a little machine quilting on mine. I have my first baby doll,which I think is the doll that the little quilt was originally made for, and now she has a little doll quilt again. It was so much fun making it. While stitching away, so many memories came flooding into my mind. Such a lovely stroll down memory lane.

Here is my original little doll quilt that my Great Grandma made. Poor thing!


Here is my remake.


Do you have a special little doll quilt that someone special made for you, that maybe is not in the best condition? Why not remake it, you will be glad you did.

Blessings to All

Tuesday, August 8, 2017

Bandanna Tote Bag


My Granddaughter wanted me to make a purse/tote bag for her and she requested it to be made out of black bandanna's.

This was such a fun project that I decided to share this tutorial with you.

What you will need: two bandanna's, fabric for the lining - this will depend on the size of your bandanna's, fusible batting, webbing for the handles - the measurement for this depends on how long you will want your handles to be and velcro to close your bag with. Optional: decorative buttons and embroidery floss.

Here we go....


 Well I had never done anything like this before. I have made tote bags, but not out of a bandanna. When I got them I saw right away that they were not straight, so had to try to square them up as best I could. I decided to cut an inch around the outside printed border. 


I chose a fusible batting for this project. I cut it about 1/2 inch smaller than the trimmed bandanna.


After I got the batting fused, I marked my quilting lines. I stated from corner to corner, on the diagonal, and spaced them 1 & 1/2 inches apart. Starting in the middle I stitched all lines alternating the direction of the sewing.


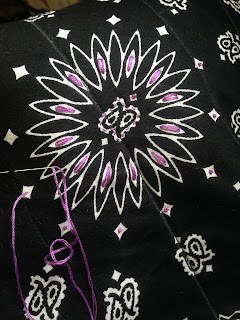
After I got the quilting done, on both pieces, to add a bit of color, I did some embroidery on the center medallion. This is just an option, you don't have to do this.


To make the purse/tote bag look more 'professional' I added a set in piece around the three sides and joined the front and back together with this strip. I cut this piece longer than the three sides to allow for sewing the corners. The width that I chose was 3 inches, so with the 1/2 inch seam allowance that I used it finished at 2 inches. You can choose how wide you want this piece to be.


For the lining, you will need to cut two pieces of fabric the same size as your quilted front and back pieces and one set-in piece. Remember to make it longer than the length of the three sides. You can trim it down if need be after you get it sewn in. On one of the large pieces I sewed two pockets, one for a cell phone and a larger one for 'what ever'.


Now you are ready to insert the lining into the bandanna bag, right sides together and sew around the top of the bag, leaving an opening for turning right side out.


After you have it sewn and turned right side out, I took my iron and ironed the edges flat. To keep the fabric in place I placed pins all around so when I did the top stitching the fabric wouldn't shift. 


Next I attached the velcro strips to the inside of the purse/tote bag by hand. They come with adhesive on the backs of them that will gum up the needle of your sewing machine and create problems.


The last step is putting on your handles. I chose a webbed piece that I purchased at the fabric store or you can make your own out of your left over lining fabric or faux leather. You choose the length that you want them to be and then sew them on the outside of your bag. I found the middle of the bag, then measured out the distance that I wanted them spaced so they would be even. Top stitch them down.

Congratulations, you are all done!


This was a fun project and when I gave it to my granddaughter she said several of her friends loved it.

Hope you enjoyed this tutorial and will want to try making one for yourself or as a gift for someone.

Blessings to all.


Sunday, July 30, 2017

One of My New Loves

I have always admired the little doll quilts that I have seen in pictures, museums etc. So, one afternoon I thought I would look up a group on Yahoo that might be about doll or little quilts. To my surprise I was able to find one, so I joined. What fun to see all of the beautiful little quilts that the members were creating. I jumped right in and started replying to posts, then I signed up for a quilt exchange. That was so much fun! I encourage all of you quilters out there to do an exchange, be it a large, medium or little quilt. My partner was a lady that was known for her beautiful workmanship. That put a bit of pressure on me, but I forged ahead. It was so much fun to pick out a pattern, make it and then send it off in the mail. I was like a child waiting for Christmas to come when my little quilt was on it's way to me. Oh the joy, when it did and I got to open it. I was thrilled to see a beautiful little 30's quilt that was made to perfection.

This is the quilt I made for my partner: I couldn't get the color's to come out right, but this shows you what it looked like.


Here is the quilt that I received from my partner:


If you are interested in doll or little quilts I encourage you to look into joining an online group. It is so much fun to get to know other's that have the same passions that you do, not to mention all of the idea's, encouragement and fun activities that come with it. The group that I joined is a Yahoo Group named smallquilttalk. The host of this group is Kathleen Tracy, she has several books published on little quilts. You can also find this group on facebook.

Have a blessed day everyone.


Monday, July 4, 2016

God Bless America

Today is the 4th of July!!
May God Bless this great nation.


Happy Birthday America!!!!!!

Thursday, January 28, 2016

Today Was Quilt Guild Day

Today was my monthly quilt guild day. We had over 100 attending today. The weather was wonderful and the speaker we had was very good. She had a nice, small trunk show along with slides and a great sense of humor. After our program we always have goodies to eat, then after that we have show and tell. There were some really pretty quilts today. I am sorry I didn't get any pictures to share :-(
After guild I usually go over to a good friends house for lunch and today we worked on planning a fabric swap with one other friend to make a Drunkards Path out of 30's prints. I am excited because I have always loved this pattern and I have needed an excuse to cut into my stash of 30's fabric. Can't wait to get started.

Here are some examples of the Drunkards Path Quilt Block Settings:


There are so many ways to set this together! Each of us gets to choose the setting we want to use. It will be interesting to see if each one of us chooses a different one. I'm excited to start pulling fabric and get to cutting.
How many of you like the Drunkards Path two patch pattern, and how difficult do you think piecing curves is? I would love to hear your thoughts.
 
Blessings to All


Friday, January 15, 2016

Thinkiing Valentines

Good day. Well the Christmas decorations are all down for another year. I do miss having the tree up, I love to look at it in the evening with the lights blazing, causing some of the ornaments to shimmer and sparkle.

So now my thoughts have turned to Valentines Day. This lovely holiday is a life saver in the middle of winter when everything is so dreary. I love all of the reds and pinks that come with it.

 I love to work with wool, so decided to create a little wool candle mat/coffee cup rug. It is so simple to make, really had fun with it. Here are the pictures from start to finish:

Here is my idea drawn out on paper.

Patterns made.

All pieces cut out and ready for placement.

Fused and ready for stitching.

Embroidery floss chosen so now the stitching begins.


All done!!

I had so much fun designing and making this! It will look pretty on one of my side tables for Valentines Day decorating.

Pattern available in my Etsy shop, fabraholic4.etsy.com

Blessings to all